Bioinformatics Building Blocks
Lessons from a Docker Container Build
by Lynn Langit and David Haley
Why Build a Docker Container?
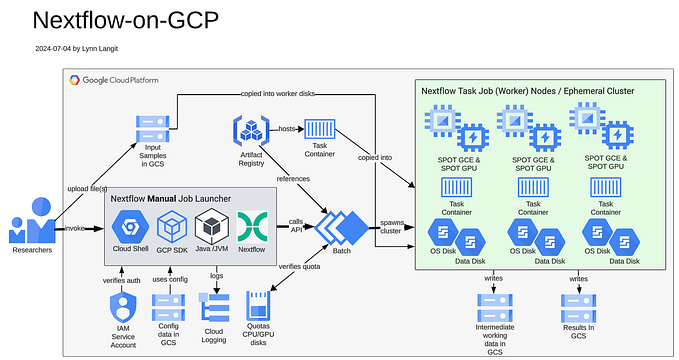
The task: Collaborate with a bioinformatician to enable the ability for her to be able to run a custom Nextflow workflow that she authored to be runnable on the public cloud. Currently she runs her workflow on an internal HPC cluster using Slurm. Google Cloud Platform (GCP) is the target cloud environment in this scenario. Core cloud services are Cloud Storage and the Google Batch API. Reference Architecture shown below.
While it is possible to run ‘raw scripts’ on Google Batch, generally one or more task containers would be used in this scenario. So, we needed to build a custom task container to meet our bioinformatician’s requirements.
What We Learned
This post includes our learnings from the process of building a new Docker container image for the scenario described above (i.e. to run Nextflow pipeline on Google Batch on GCP). Several of the techniques we used are general best practices for building containers.
Tip: For the basic structure of a Dockerfile and commonly used docker commands, see the Appendix at the end of this post.
Determine Build Approach
To get started, we decided to build one monolithic container for all of the required language runtimes and libraries for the workflow. Although it is normally most optimal to build one or more Docker container images that are as small as possible, (i.e. one container per tool, language or library), we decided to build one big container as a starting point and due to our bioinformatician’s work deadlines.
Review Requirements
Our list of required language runtimes and libraries was long, but not unusually so for a bioinformatics workflow. The full source code for our spaFlow Nexflow workflow is available on GitHub. The initial list of 27 requirements (which was based on running on HPC) is shown below:
- Nextflow 23.04.2
- requires: bash, java 11 [or later, up to 21] git and docker
2. Python 3.8 + Python libraries
- scimap 1.3.2, anndata 0.7.8, pandas 1.5.3
- scanpy 1.9.6 + pandoc 3.1.2
3. R 4.2.2 + R libraries
- knitr 1.44, ggplot2 3.4.4, data.table 1.14.8d, dplyr 1.1.3
- Seurat >5.0, progressr 0.14.0, kableExtra 1.3.4, ComplexHeatmap 2.15.4
- ggridges 0.5.4, clustree 0.5.0, pheatmap 1.0.12, plyr 1.8.9, pander 0.6.5
- CELESTA 0.0.0.9000 + Rmixmod 2.1.9, spdep 1.3–3, reshape2 1.4.4, zeallot 0.1.0
Run and Test Locally First
To simplify and to speed up development iteration cycles, we built and ran the Nextflow workflow with our evolving custom Docker container running locally before we attempted to run our solution in the cloud.
Because we needed to build a large/complex container, we first started the container locally and attempted to run the workflow from within the running container to have visibility into the ‘guts’ of what is installed correctly as we were iteratively building. Example commands are shown below.
#build and tag
docker build -f deployment/Dockerfile . -t spaflow:latest

# run interactively
docker run -it spaflow:latest

# from within the container
nextflow run main.nf
We built our container image frequently as we added functionality to it. We also tested end-to-end by attempting to run the associated Nextflow workflow using the Nextflow local docker profile from the Nextflow workflow config file. We iterated and added additional required libraries on each workflow test run failure.
nextflow run main.nf -c nextflow.config -profile dockerTip: We automated the deletion of intermediate files (from the Nextflow `\work` dir) to keep our workspace tidy during this build phase.
Use Docker Build Caching
We used Docker’s default build caching feature to significantly speed up test iterations. This builds the new container while reusing the previous container’s layers when possible. See Docker docs on caching. This feature was particularly useful for our growing mono-container (eventually growing to 2000+ libraries!). It was important to order the build commands according to what was changing the most.
docker build . -t <image>You can also instruct Docker to pull from a remote image, using — cache-from registry/image . We used this feature with Google Cloud Build, syntax is shown below.
docker build -t <image> \
 - cache-to type=local,dest=path/to/local/dir[,parameters…] \
 - cache-from type=local,src=path/to/local/dir .
Phase 1: Pick the Best Fit Base Container
To start, we located the smallest-sized language-appropriate base container image to test. We tried a number of different base container images to find the best fit between simplicity and usefulness. We eventually selected an R-language based container image due to the number of R libraries required for this use case. Shown below are the top lines from our DOCKERFILE:
# Base image with Java, R, and Python
FROM rocker/r-ver:4.4.1
Phase 2: Building: Python First
Because our custom container requirements included multiple languages, we decided to start by building for the Python requirements. We started here because there are more known Python container building patterns and we are more familiar with this language and libraries management processes than we are for R. We built modularly — i.e. base image, tools, first the language (Python) and then its associated required libraries (including required versions).
The Python build was made complicated only by the need to lock versions of Python and associated libraries. Shown below is that section of our DOCKERFILE:
# Add the deadsnakes PPA to get Python 3.8
RUN apt-get update && apt-get install -y software-properties-common && \
add-apt-repository ppa:deadsnakes/ppa && \
apt-get update
RUN apt-get install -y \
apt-utils \
curl \
git \
libcurl4-openssl-dev \
libfontconfig1-dev \
libgdal-dev \
libhdf5-serial-dev \
libssl-dev \
libudunits2-dev \
libxml2-dev \
libxt-dev \
openjdk-17-jdk \
pandoc \
pkg-config \
python3.8 python3.8-dev python3.8-distutils python3-pip \
vim \
zlib1g-dev

# Set system default python to 3.8 (10 == priority, not sure this matters much)
RUN update-alternatives - remove python /usr/bin/python2
RUN update-alternatives - install /usr/bin/python python /usr/bin/python3.8 10

# Python Packages
RUN python -m pip install 'scimap==1.3.2' 'anndata==0.7.8' 'pandas==1.5.3' 'scanpy==1.9.6'
Phase 3: Continuing the Build: Nextflow
Building the Nextflow requirement was simple, because we selected a base image that included the required version of Java for Nextflow. So we just had to make sure Nextflow itself was available in our container. Shown below is that line from our DOCKERFILE:
# Install Nextflow
RUN curl -s https://get.nextflow.io | bash && mv nextflow /usr/local/bin
Phase 4: Continuing the Build: R Challenges!
Building the R requirements proved considerably more daunting due to the number of libraries and interrelated dependencies. Also building on a Mac and then later attempting to build for a Linux (Cloud OS), resulted in some inconsistencies during R library installation. We discovered and used a powerful tool to ‘see into’ exactly what was being installed during the container build, the tool (R:env) and how we used it, is described in the next paragraphs.
We used the R:env tools to snapshot installed R library versions in our container when we built on various base OS’s. We followed the renv tools process as described below to find and fix discrepancies in R library dependency versions.
From the renv documentation —
“The general workflow when working with renv is:
- Call renv::init() to initialize a new project-local environment with a private R library,
- Work in the project as normal, installing and removing new R packages as they are needed in the project,
- Call renv::snapshot() to save the state of the project library to the lockfile (called renv.lock),
- Continue working on the project, installing and updating R packages as needed.
- Call renv::snapshot() again to save the state of the project library if the attempts to update R packages were successful, or call renv::restore() to revert to the previous state as encoded in the lockfile if the attempts to update packages introduced some new problems.”
Using this tool we were able to build a functional container for the workflow. However, as the DOCKERFILE code below shows, our implementation was in no way elegant. Refactoring this section of the DOCKERFILE to fix and remove redundant library installs is high on our ‘next steps’ to improve this container.
# Install R packages (ensuring dependencies are handled)
RUN R - quiet -e "install.packages(c('knitr', 'ggplot2', 'data.table', 'dplyr'))"

# Notes on R dependencies:
# If we remove the 1st Seurat install, the container fails.
# If we remove the redundant installs for kableExtra, ComplexHeatmap, clustree, the container fails.
# We aren't 100% sure why this is … but … this works, so we're keeping it.
RUN R - quiet -e "install.packages('Matrix', repos = 'https://cloud.r-project.org', version='>= 1.6–4')"
RUN R - quiet -e "install.packages('Seurat', repos = 'https://cloud.r-project.org')"
RUN R - quiet -e "install.packages(c('progressr', 'kableExtra', 'ComplexHeatmap', 'ggridges', 'clustree', 'pheatmap', 'plyr'))"
RUN R - quiet -e "install.packages(c('pander', 'CELESTA', 'Rmixmod'))"
RUN R - quiet -e "install.packages(c('spdep', 'reshape2', 'zeallot'))"
RUN R - quiet -e "install.packages(c('leiden', 'reticulate', 'SeuratObject'))"
RUN R - quiet -e "install.packages(c('systemfonts', 'ggforce', 'ggraph'))"
RUN R - quiet -e "install.packages(c('png'))"
RUN R - quiet -e "install.packages('Seurat')"
RUN R - quiet -e "install.packages('BiocManager')"
RUN R - quiet -e "BiocManager::install('ComplexHeatmap')"
RUN R - quiet -e "install.packages('clustree')"
RUN R - quiet -e "install.packages('kableExtra')"
RUN R - quiet -e "install.packages('Matrix')"
RUN R - quiet -e "install.packages('remotes')"
RUN R - quiet -e "remotes::install_github('plevritis-lab/CELESTA')"
Finishing Up
To complete the custom container, we added lines to the DOCKERFILE which run a general cleanup to reduce the container image size, to set the application working directory and to copy the application files into our container. We also copied in a generic Nextflow config file and a sample input data file for ease of testing.
# Cleanup to reduce image size
RUN apt-get clean && rm -rf /var/lib/apt/lists/*

# Set working directory
WORKDIR /app
COPY data/ /app/data
COPY modules/ /app/modules
COPY scripts/ /app/scripts
COPY main.nf /app/main.nf
COPY nextflow.config /app/nextflow.config
COPY celesta_prior_matrix.csv /app/celesta_prior_matrix.csv
What We Learned and Next Steps
This container was daunting to build, due to the complexity and number of dependencies.
We spent over 40 work hours to design, build and test to produce a working 75-line DOCKERFILE.
While the initial list of requirements was already long with 27 items, the final container included over 2,000 libraries due to dependencies! Our final DOCKERFILE for spaFlow is on Github.
To understand what changes we made to the spaFlow Nextflow configuration settings and files to be able to run on Google Batch, see the associated article on the Nextflow blog which explains how we ran our custom container on GCP.
As mentioned, the R section is our top candidate for refactoring, so we’ll work on improving that in the next iteration. Then we may also attempt to create two containers — one for the Python + libraries and another one for the R + libraries. As mentioned previously, container modularity was not a focus at this time in our build cycle due to project deadlines.
Additionally, during the build process we reduced scanned security vulnerabilities from 1308 to 514 (mostly by thoughtfully selecting our base container). We will next be addressing (and fixing) vulnerabilities identified by our container scanning tool as ‘critical’ by updating library (or dependent library) versions and iterating through our test cycle to ensure our container still functions properly. We used Google Cloud Artifact Registry scanning to identify vulnerabilities (screenshot shown below).
Appendix: DOCKERFILE Commands
Quick guide to key docker terminologies.
Base DOCKERFILE Instructions:
Listed below are common DOCKERFILE commands used during the container building lifecycle.
FROM: Specifies the base image to start from.

RUN: Executes commands within the image during the build process.

COPY: Copies files/directories from your host machine to the image.

ADD: Similar to COPY, but can also handle archives and URLs.

WORKDIR: Sets the working directory for subsequent instructions.

ENV: Sets environment variables within the image.

EXPOSE: Exposes ports for the application running in the container.

CMD: Specifies the default command to run when the container starts.
Core Docker Commands:
Listed below are common docker commands used during the container building lifecycle.
# docker tag (tags an image)
docker tag my-custom-image my-registry/my-custom-image:latestdocker build (builds an image) - docker build -t my-custom-image .

# docker images (lists images)
docker images

# docker run (runs a container)
docker run -it my-custom-image bash

# docker exec (executes a command in a container)
docker exec -it my-container-name ls -l

# docker ps (lists running containers)
docker ps or docker ps -a (all containers)

# docker stop (stops a container)
docker stop my-container-name

# docker rm (removes a container)
docker rm my-container-name

# docker push (pushes an image to a registry)
docker push my-registry/my-custom-image:latest

# docker history (shows history)
docker history my-custom-image
